
In part 2 of configuring Vyatta I implemented simple firewall rules which blocked all network traffic. Next step is to implement firewall rules which will allow us to connect to ESXi hosts as well to vCenter server.
Firewall hardening
In my case I opened following ports:
- 22 - SSH
- 53 - DNS
- 80 - HTTP
- 902 - vCenter Server / VMware Infrastructure Client - UDP for ESX/ESXi Heartbeat
- 903 - Remote Console
- 443 - Web Access
- 3389 - RDP
I didn’t open any extra port so far but opening firewall port is relatively easy. In order to do it type on Vyatta:
- set firewall name WAN-TO-LAN rule 39
- set firewall name WAN-TO-LAN rule 39 action accept
- set firewall name WAN-TO-LAN rule 39 description “RDP to Domain Controller”
- set firewall name WAN-TO-LAN rule 39 destination address 10.0.0.11
- set firewall name WAN-TO-LAN rule 39 destination port 3389
- set firewall name WAN-TO-LAN rule 39 source address 192.168.255.101
- set firewall name WAN-TO-LAN rule 39 protocol tcp
- set firewall name WAN-TO-LAN rule 39 log enable
- set firewall name WAN-TO-LAN rule 39 state established enable
- set firewall name WAN-TO-LAN rule 39 state new enable
- set firewall name WAN-TO-LAN rule 39 state related enable
If you are following motto - work smart not hard then I suggest that you use firewall generator from a website. It will literally save you a lot of time to put all Firewall rules in place. You need to download excel file and put all ports you need to open in a specific rule. As on my example, you will see rules:
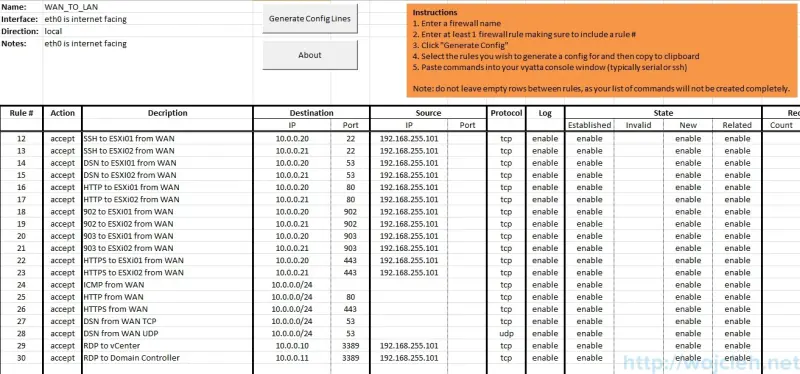
You can also download generated firewall rules prepared by myself using this link Vyatta_firewall.xls.
In case you don’t remember ports to open to allow communication to ESXi host and vCenter server you can find it in VMware KB http://kb.vmware.com/kb/1005189.
In next post, I will create trunk and LACP so much fun is coming 🙂