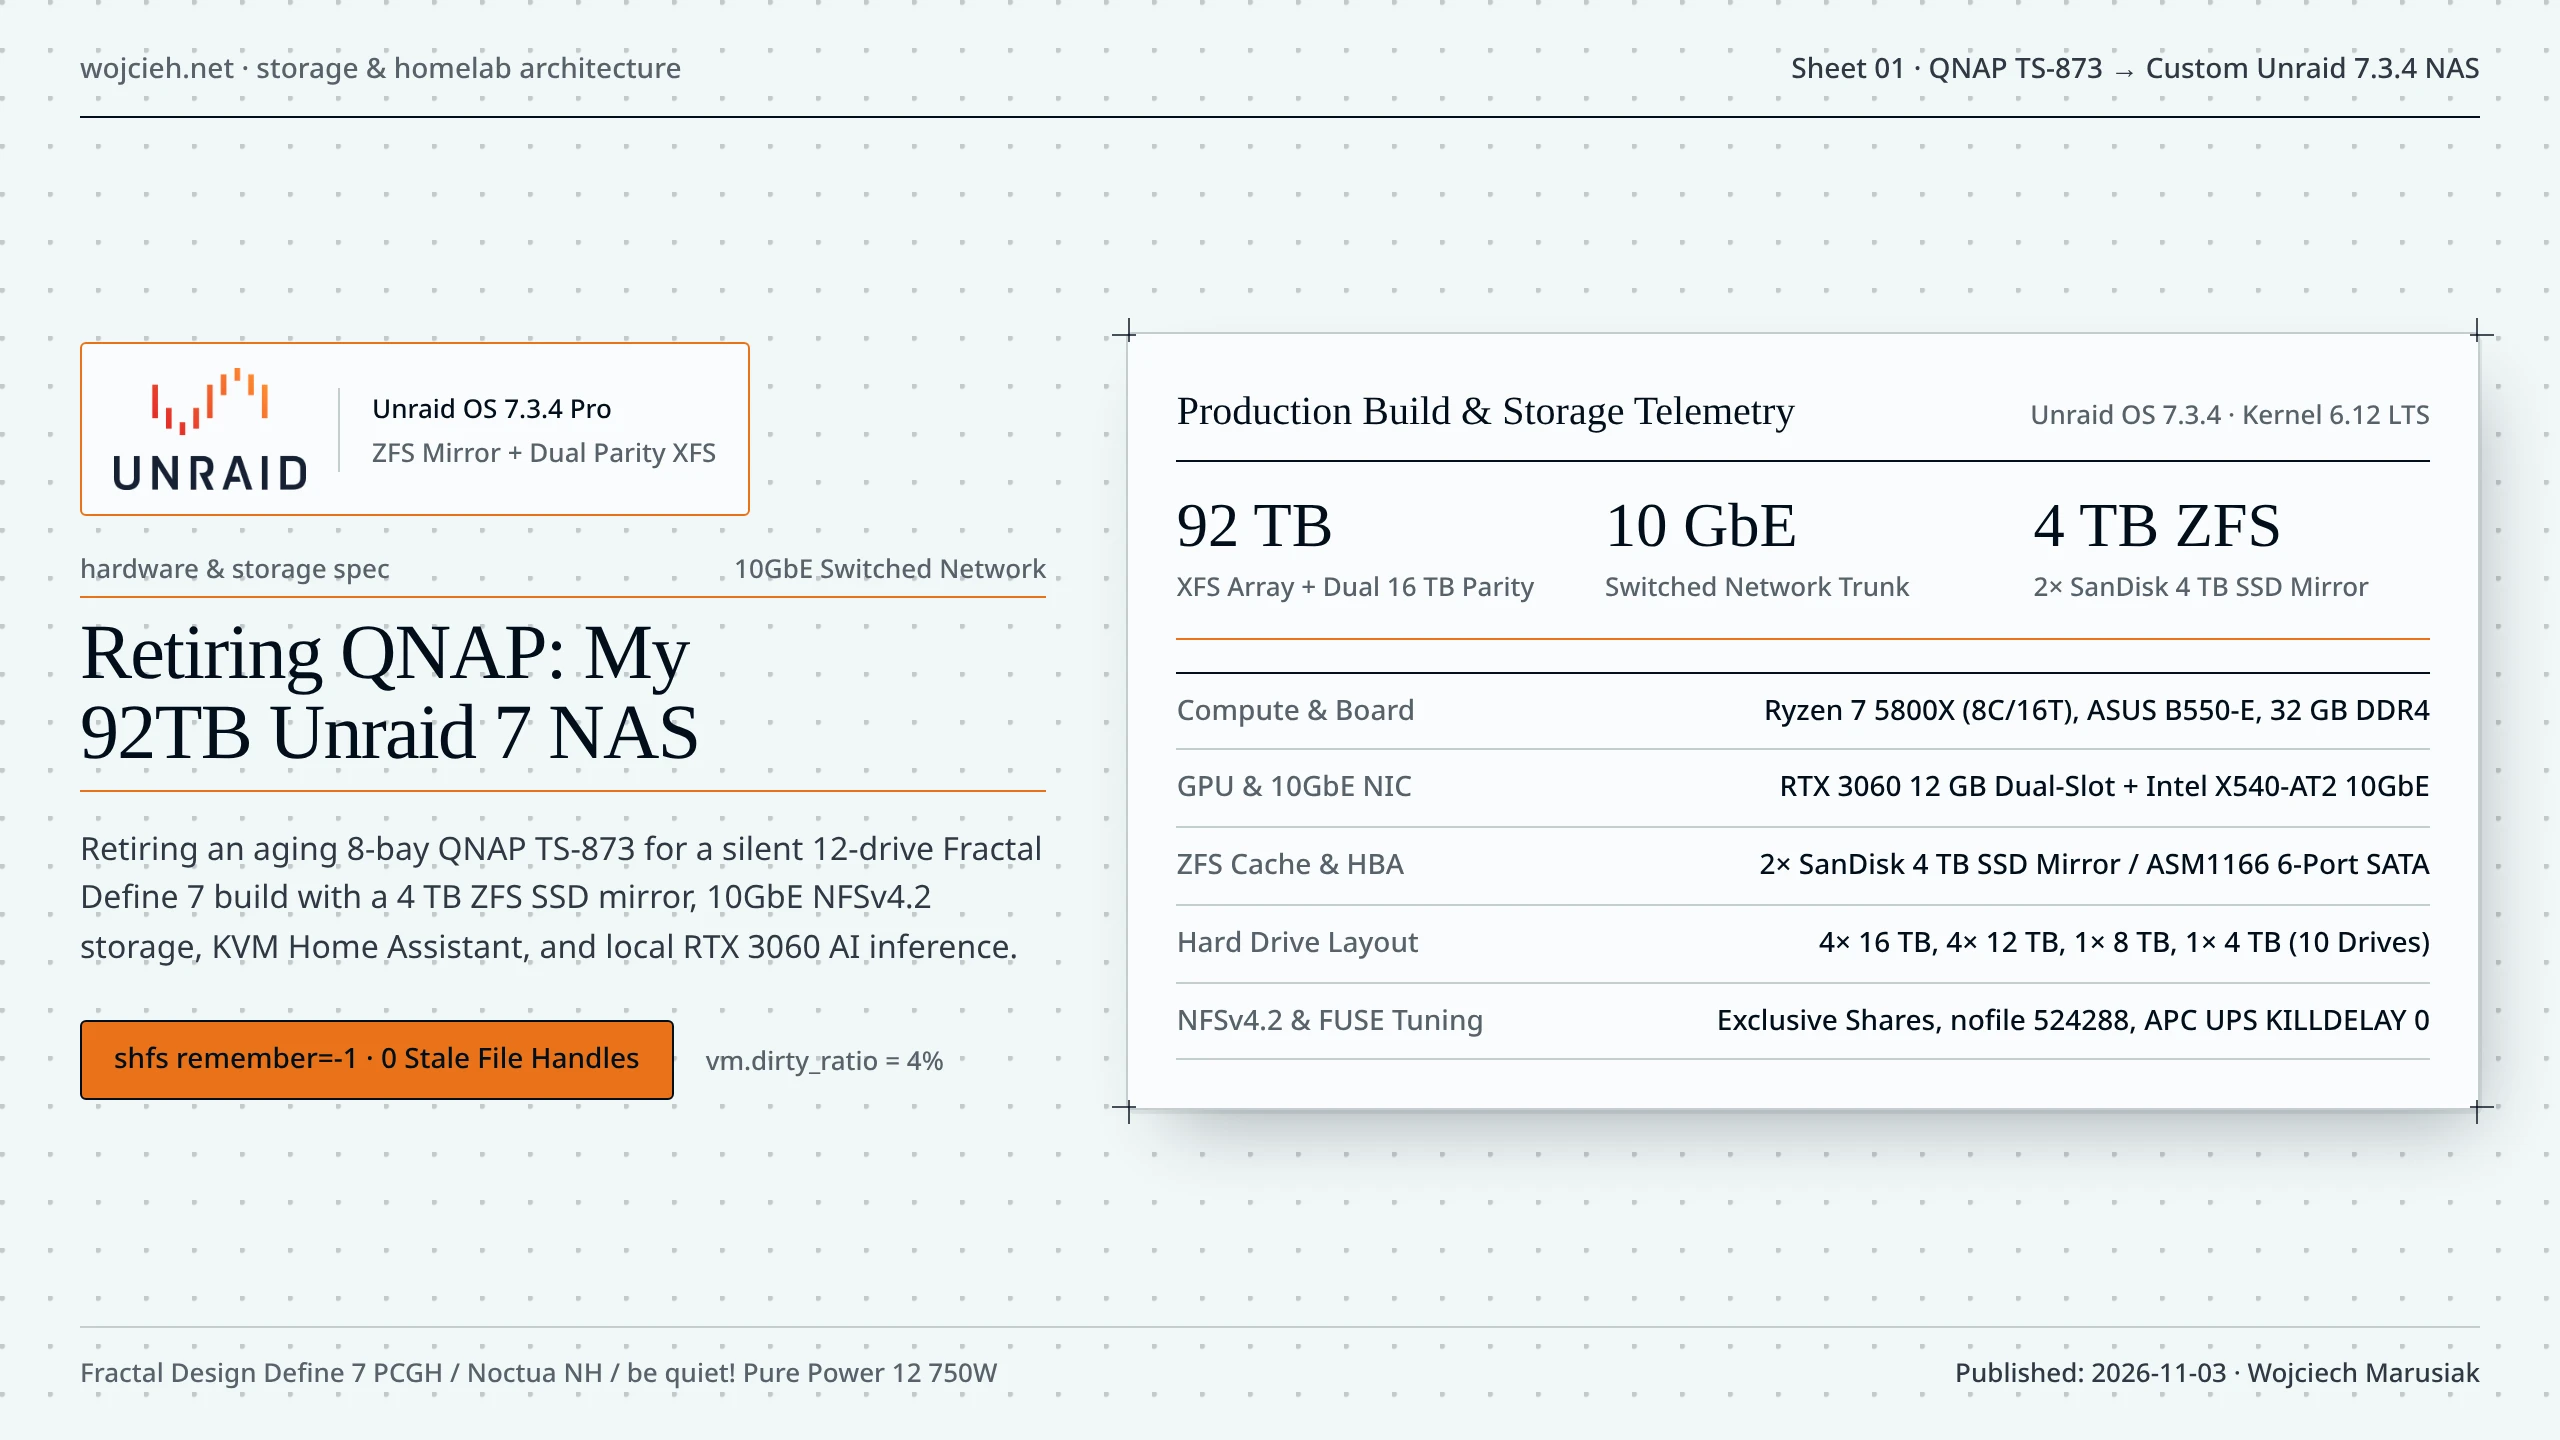
For several years, my 8-bay QNAP TS-873 handled everything I threw at it: NFS shares, Time Machine backups, Jellyfin media, and a Home Assistant virtual machine. Eventually, the hardware hit a wall. The embedded AMD RX-421BD quad-core CPU choked during heavy I/O, QTS firmware updates took twenty minutes to reboot, all eight 3.5-inch drive bays were full, and the proprietary chassis had neither the physical clearance nor the PCIe power delivery to host a full-height NVIDIA GPU for local AI workloads.
In today’s post, I will walk you through how I reused the AMD Ryzen 7 5800X, ASUS ROG STRIX B550-E GAMING motherboard, and 32 GB of DDR4-3600 RAM left over from my recent AM5 workstation upgrade to build a silent, 12-drive Unraid OS 7 server with a 4 TB ZFS SSD mirror, 10GbE networking, KVM virtualization, and an NVIDIA RTX 3060 12GB for local CUDA inference.
Step 1: Hardware Architecture & PCIe Slot Layout
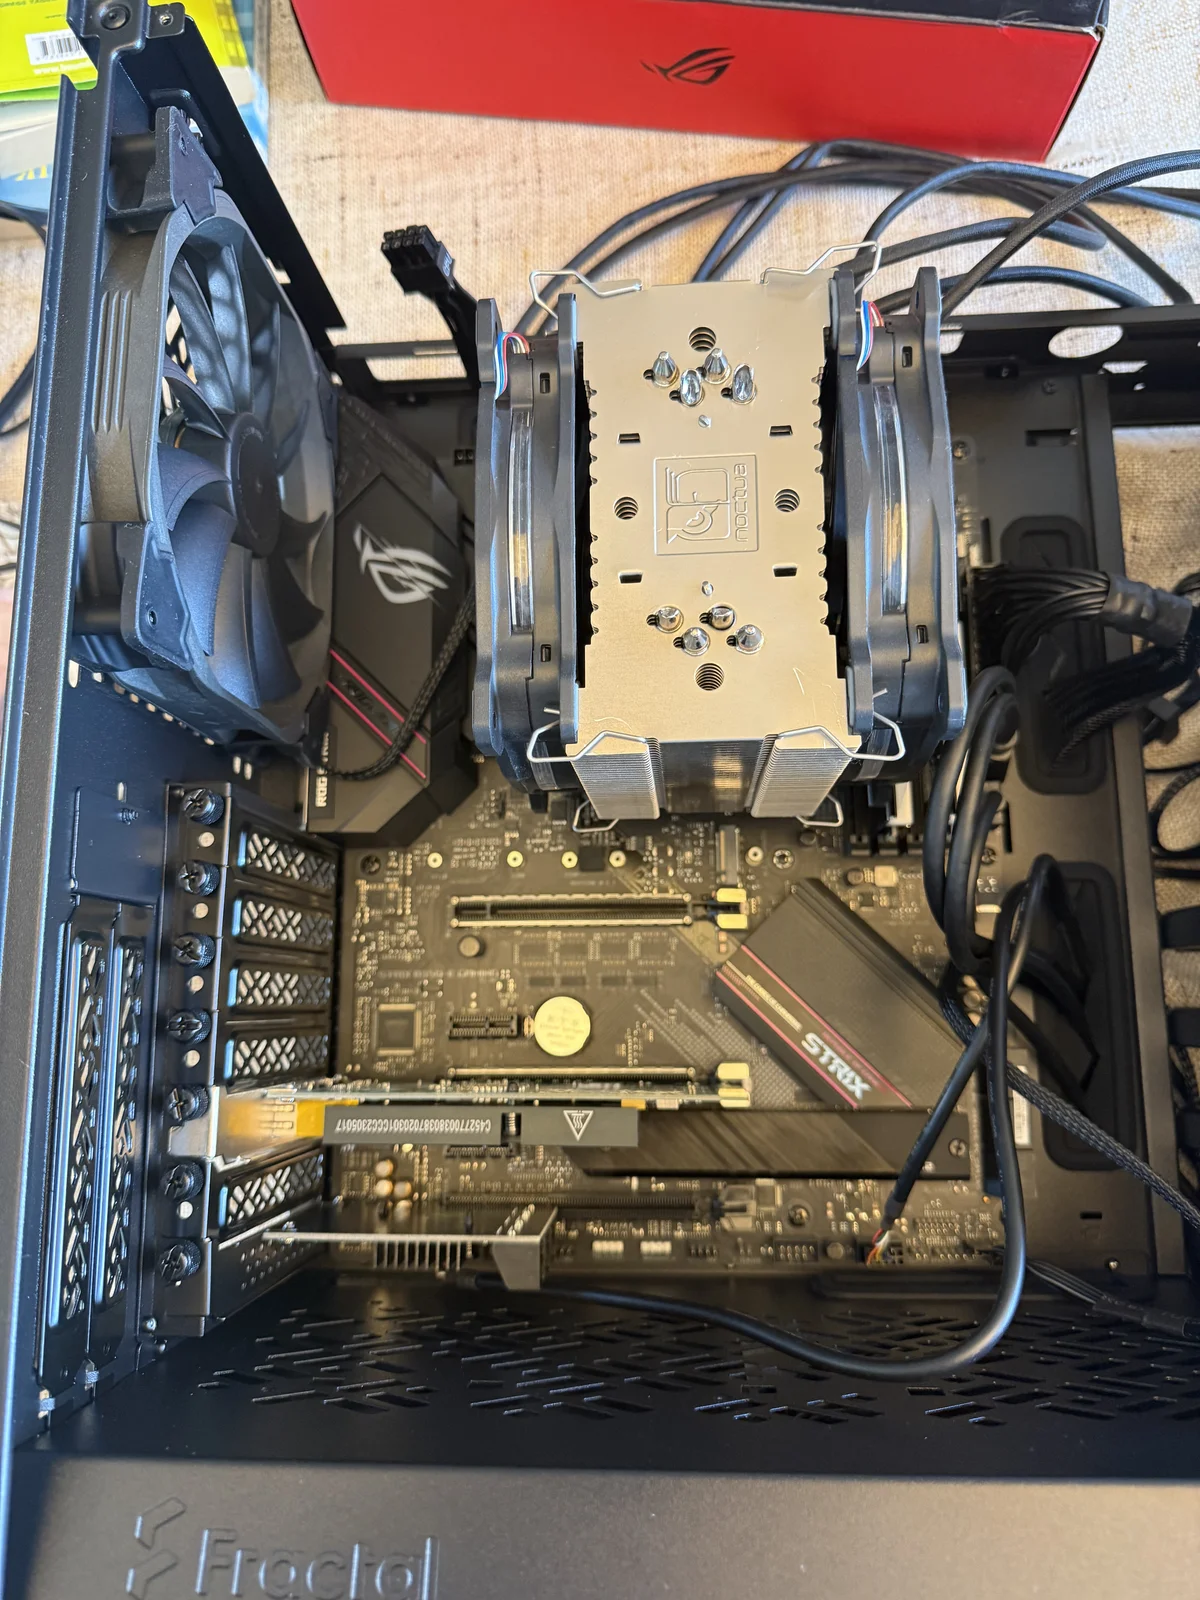
Repurposing desktop components into a 24/7 storage server works well only if you plan your PCIe lanes, SATA controllers, and power delivery ahead of time.
| Component | Model / Specification | Role in the NAS |
|---|---|---|
| Chassis | Fractal Design Define 7 PCGH Edition | Sound-dampened full tower supporting up to 14× 3.5" HDD trays |
| CPU | AMD Ryzen 7 5800X (8C / 16T, Zen 3) | Compute for ZFS, KVM (HAOS), and high-speed parity calculations |
| CPU Cooler | Noctua NH Tower Cooler | Near-silent thermal dissipation under continuous load |
| Motherboard | ASUS ROG STRIX B550-E GAMING | Splits CPU lanes into PCIe 4.0 x8 / x8 across Slots 1 & 2 |
| Memory | 32 GB (2× 16 GB) DDR4-3600 | Host OS, ZFS ARC cache, KVM VM, and RAM transcoding |
| GPU (Slot 1) | NVIDIA GeForce RTX 3060 12GB (Dual-Slot) | Local AI inference (Ollama, Wyoming Whisper STT & Piper TTS) |
| 10GbE NIC (Slot 2) | Intel X540-AT2 Dual-Port 10GBase-T | 10GbE uplink to the core switch |
| SATA HBA (Slot 4) | ASM1166 6-Port SATA III 6Gb/s (PCIe x4) | Expands onboard 6× SATA to 12× SATA 6Gb/s ports (all 12 populated) |
| ZFS Cache Pool | 2× SanDisk Ultra 3D 4 TB SSD | 4 TB ZFS Mirror (/mnt/cache) for appdata, KVM domains, and system |
| Hard Drives | 10× 3.5" HDDs (4× 16 TB, 4× 12 TB, 1× 8 TB, 1× 4 TB) |
92 TB usable XFS data array (8 data drives) + Dual 16 TB Parity |
| Power Supply | be quiet! Pure Power 12 750W 80+ Gold (ATX 3.0) | Single high-current +12V rail for 10+ HDD spin-up surges + GPU |
| UPS | APC Back-UPS BX1200MI (1200 VA / 650 W) | USB apcupsd master protecting NAS, UDM Pro router, and MS-01 host |
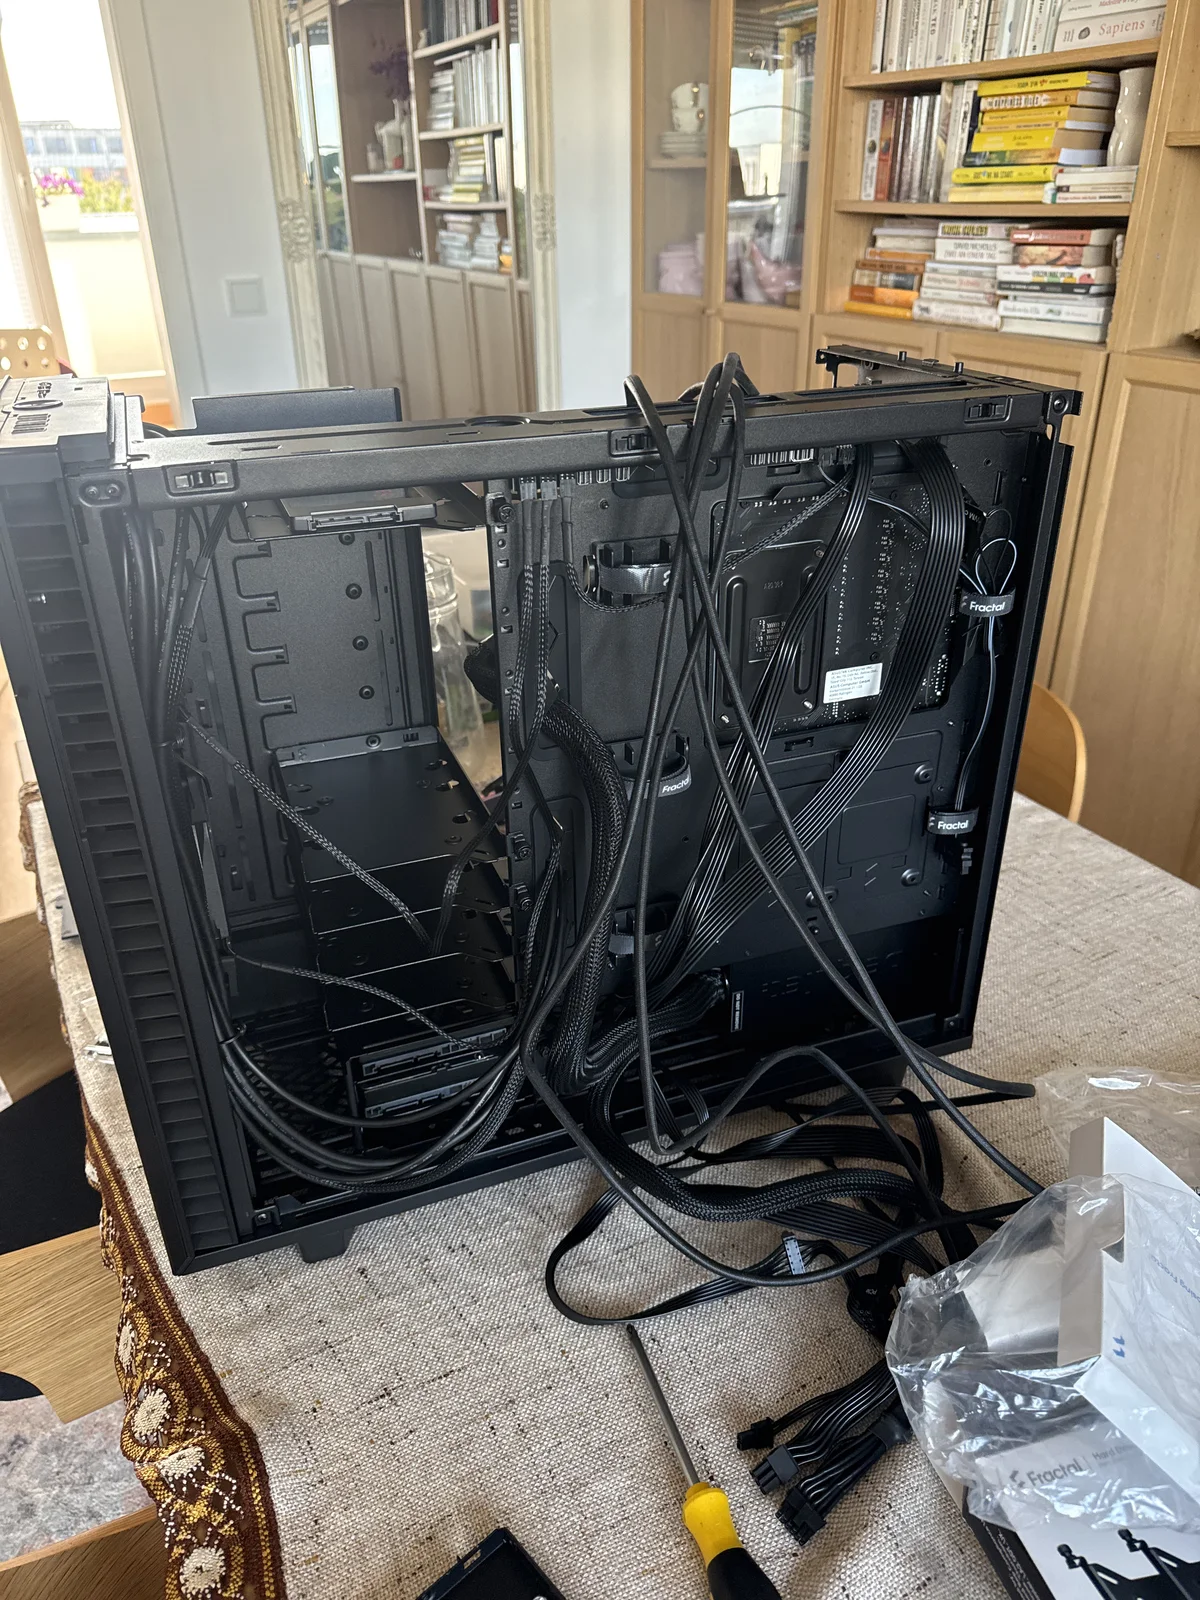
Fitting Both a GPU and a 10GbE Card on a B550 Motherboard
Running a dedicated GPU alongside a 10GbE network card and a 6-port SATA expander on a consumer AM4 board requires careful attention to how the motherboard routes PCIe lanes. Cheap B550 motherboards wire the primary slot (PCIEX16_1) to the CPU at x16 and route the second full-length slot (PCIEX16_2) through the B550 chipset at PCIe 3.0 x4, which often disables onboard SATA ports or the second M.2 slot when populated. The ASUS ROG STRIX B550-E GAMING avoids this by splitting the 16 PCIe 4.0 lanes from the Ryzen 7 5800X directly into PCIe 4.0 x8 (PCIEX16_1) + PCIe 4.0 x8 (PCIEX16_2). That gives the RTX 3060 12GB PCIe 4.0 x8 bandwidth in Slot 1 while giving the Intel X540-AT2 10GbE card dedicated CPU lanes in Slot 2 without touching chipset I/O.
The bottom full-length slot (PCIEX16_3, wired to the chipset at PCIe 3.0 x4) hosts the ASM1166 6-port SATA controller. Unlike older enterprise SAS HBAs such as the LSI 9211-8i that burn 12–15W at idle and block deeper PCIe ASPM power states, the ASM1166 draws under 2W and works out of the box with the Linux ahci driver.
Gotcha: Check the physical thickness of your GPU before buying! On the B550-E,
PCIEX16_1andPCIEX16_2sit three slots apart. A 2.5-slot or 3-slot gaming GPU physically covers the second x16 slot, leaving nowhere to plug in the 10GbE card. Stick to a strict 2.0-slot card, and mount an auxiliary fan across the lower PCIe zone because server NICs like the Intel X540-AT2 expect rackmount airflow and run very hot in a silent tower case.
Step 2: Storage Layout & The “Parity-Last” Migration Strategy
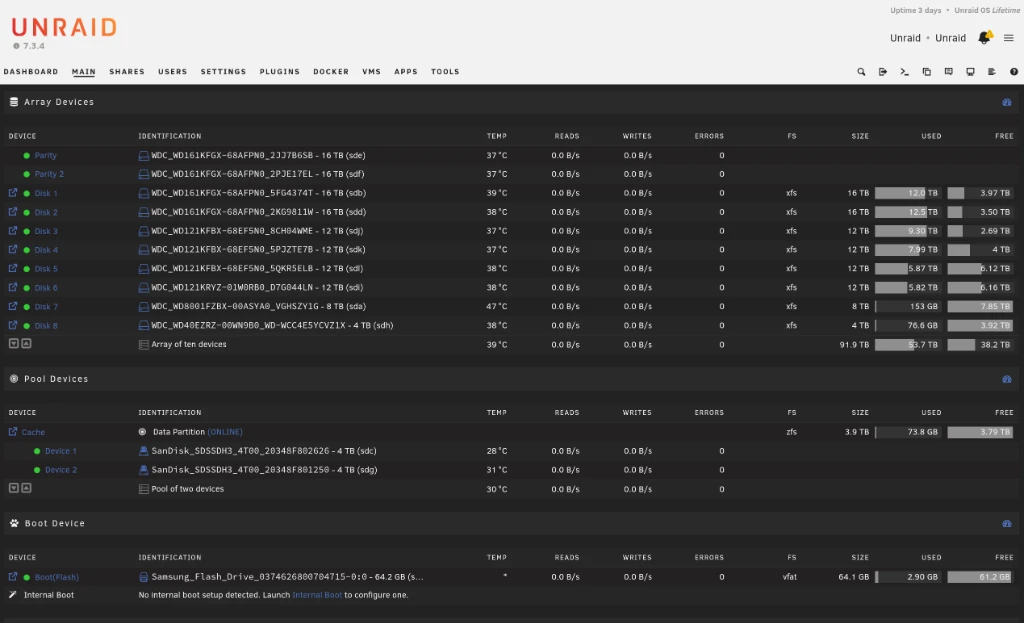
Moving away from QNAP’s rigid RAID groups to Unraid 7 let me combine all 10 hard drives (4× 16 TB, 4× 12 TB, 1× 8 TB, and 1× 4 TB) into a single pool protected by Dual Parity, backed by a 4 TB ZFS cache mirror (2× SanDisk 4 TB SSD) across all 12 SATA ports:
|
|
Migrate Your Bulk Data Before Assigning Parity Drives
Note: Do not assign
Parity 1andParity 2before your initial data migration! If you enable parity on day one and start copying 60+ TB of data into the Unraid array, every write triggers a read-modify-write parity calculation across the spinning disks and throttles your transfer speeds to 60–90 MB/s.
Instead, run the migration in two steps:
- Stage 1 (Unprotected Bulk Ingest): Assign only the 8 XFS data drives (
Disk 1throughDisk 8) with no parity drives installed. Run backgroundrsyncjobs over the 10GbE network from the old QNAP NAS and from external USB 3.2 staging drives (22 TB Seagate Exos+14 TB WD Red Promounted via the Unassigned Devices plugin):Without parity overhead, writes saturate the native mechanical speed of each target drive (1 2rsync -avh --no-inc-recursive --info=progress2 \ /mnt/disks/USB_Staging_22TB/Media/ /mnt/user/Media/180–240 MB/sper disk). - Stage 2 (Enable Dual Parity): Once the initial multi-terabyte ingest finishes, stop the array, assign both 16 TB WD Red Pro drives to
Parity 1andParity 2, and start the array. Unraid builds Dual Parity sequentially from outer to inner cylinders at210+ MB/sin a single pass.
Step 3: 10GbE Networking & Fixing NFSv4.2 Stale File Handle Errors
My compute layer runs on a separate Minisforum MS-01 server (Intel Core i9, 96 GB RAM, CachyOS) hosting 70+ Docker containers, while bulk media and backups live on the Unraid NAS. Both servers connect via 10GbE (Intel X710-DA2 on the MS-01 and Intel X540-AT2 on Unraid) into the core 10GbE switch.
Sequential disk benchmarks over NFSv4.2 confirmed the storage stack was performing at full speed:
|
|
Fixing ESTALE (errno -116) & I/O Freezes Under Heavy Load
The dd numbers looked great right until I ran a multi-terabyte background rsync while Immich was generating machine-learning thumbnails and Jellyfin and Sonarr were scanning libraries over NFSv4.2 from the MS-01 Docker host. Containers started crashing with:
|
|
At the same time, directory listings (ls /mnt/nas_share) on the Docker host would freeze for 15–20 seconds. I spent several hours digging through Unraid (6.12 LTS kernel) and shfs behaviour to track down all three root causes so you don’t have to:
- Unraid
shfsinode eviction (fuse_remember=330): When you export/mnt/user/<share>over NFS, clients talk torpc.nfsdon top of Unraid’s FUSE filesystem (/usr/libexec/unraid/shfs). By default,shfscaches inode mappings in RAM for only 330 seconds (-o remember=330). Under heavy file-scanning load from Immich and Jellyfin,shfsevicts older inode entries from memory. The moment a remote NFSv4.2 client references an evicted file handle,shfsfails to resolve the inode and returnsESTALE. - Linux dirty page writeback stalls (
vm.dirty_ratio=20): On a server with 32 GB of RAM, Linux’s defaultvm.dirty_ratio=20andvm.dirty_background_ratio=10allow the kernel to buffer up to 6.4 GB of uncommitted writes in RAM during anrsyncjob before forcing synchronous writeback. Flooding mechanical HDDs with a 6.4 GB flush blocksshfsandnfsdworker threads for 20+ seconds. - Client-side
actimeo=1800caching: Many homelab guides suggest addingactimeo=1800to/etc/fstabto reduce metadata lookups. On a media server, caching directory attributes for 30 minutes means Sonarr, Radarr, and Jellyfin cannot see newly downloaded files created on the NAS for half an hour.
The 4-Step Fix
-
Disable
shfsInode Eviction & Enable Exclusive Shares: In/boot/config/share.cfgon the Unraid USB flash drive, setfuse_rememberto-1(never evict cached inodes until array stop), raise the file descriptor limit forshfsto524288, and enable Exclusive Shares. Cache-only ZFS shares (appdata,domains,isos,system,backup) then use direct kernel symlinks (/mnt/user/appdata -> /mnt/cache/appdata, shown as▸ Cachein the Unraid UI) and bypass FUSE completely, while bulk media and backup shares (Cache ➔ Array) stage incoming writes on the ZFS SSD pool before the nightly Mover flushes them to the XFS array: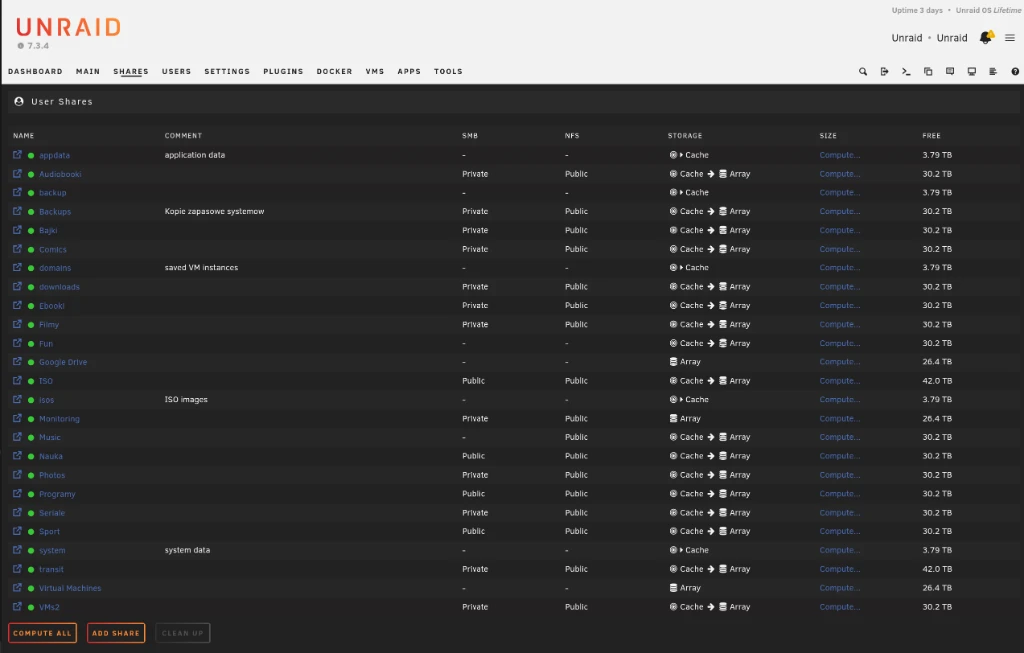
1 2 3 4# /boot/config/share.cfg shareUserExclusive="yes" shareFuseRemember="-1" shareNOFILE="524288"After restarting the array, verify that
shfsis running with-o remember=-1:1 2root@NAS:~# ps aux | grep shfs root 14210 2.1 0.4 845120 148200 ? Ssl 12:14 0:42 /usr/libexec/unraid/shfs /mnt/user -disks 255 -o default_permissions,allow_other,noatime -o remember=-1 -
Clamp Kernel Dirty Page Writeback in
/boot/config/go: To force the Linux kernel to flush writes continuously in smaller batches (~600 MB background, ~1.2 GB hard ceiling) instead of stalling the bus with multi-gigabyte flushes, persistsysctlrules in/boot/config/go:1 2 3 4 5 6 7#!/bin/bash # Start the Management Utility /usr/local/sbin/emhttp # Tune Linux writeback cache for smooth NFSv4.2 / shfs latency sysctl -w vm.dirty_background_ratio=2 sysctl -w vm.dirty_ratio=4 -
Automate Unraid 7 Settings via
/var/run/emhttpd.socket: If you manage your server via SSH or Ansible, trying toPOSTconfiguration changes to Unraid’s Nginx web interface (http://localhost/update.htm) fails unless you scrape session cookies and CSRF tokens. In Unraid 7,emhttpdlistens directly on a local Unix domain socket at/var/run/emhttpd.socket. You can apply system changes or trigger array actions from the CLI withcurl --unix-socket:1 2 3 4# Programmatically updating a share or system setting via emhttpd Unix socket curl --unix-socket /var/run/emhttpd.socket \ http://localhost/update.htm \ -d "shareFuseRemember=-1&shareUserExclusive=yes&changeShare=Apply" -
Configure Clean Client
/etc/fstabMount Options on the Docker Host: On the Minisforum MS-01 Docker host, mount the Unraid exports using NFSv4.2 with 1 MB read/write blocks (1048576),async,hard,noatime, and withoutactimeo:1 2 3# /etc/fstab on Docker Host (MS-01) 10.10.255.50:/mnt/user/Media /mnt/nas_media nfs4 nfsvers=4.2,rw,async,hard,intr,noatime,rsize=1048576,wsize=1048576,_netdev 0 0 10.10.255.50:/mnt/user/Backup /mnt/nas_backup nfs4 nfsvers=4.2,rw,async,hard,intr,noatime,rsize=1048576,wsize=1048576,_netdev 0 0Verify the active kernel mount flags with
nfsstat -mto confirmvers=4.2,rsize=1048576,wsize=1048576are negotiated. Since applying these four changes, I haven’t seen a singleStale file handleerror, even during simultaneous 10GbErsyncmigrations and Immich ML indexing.
Step 4: Home Assistant OS on KVM, Live fsfreeze Backups & Offsite Cloud Sync
On the old QNAP TS-873, my Home Assistant OS (HAOS) virtual machine ran inside QNAP Virtualization Station with noticeable UI lag during database purges. Migrating it to Unraid took less than fifteen minutes:
- Copied the
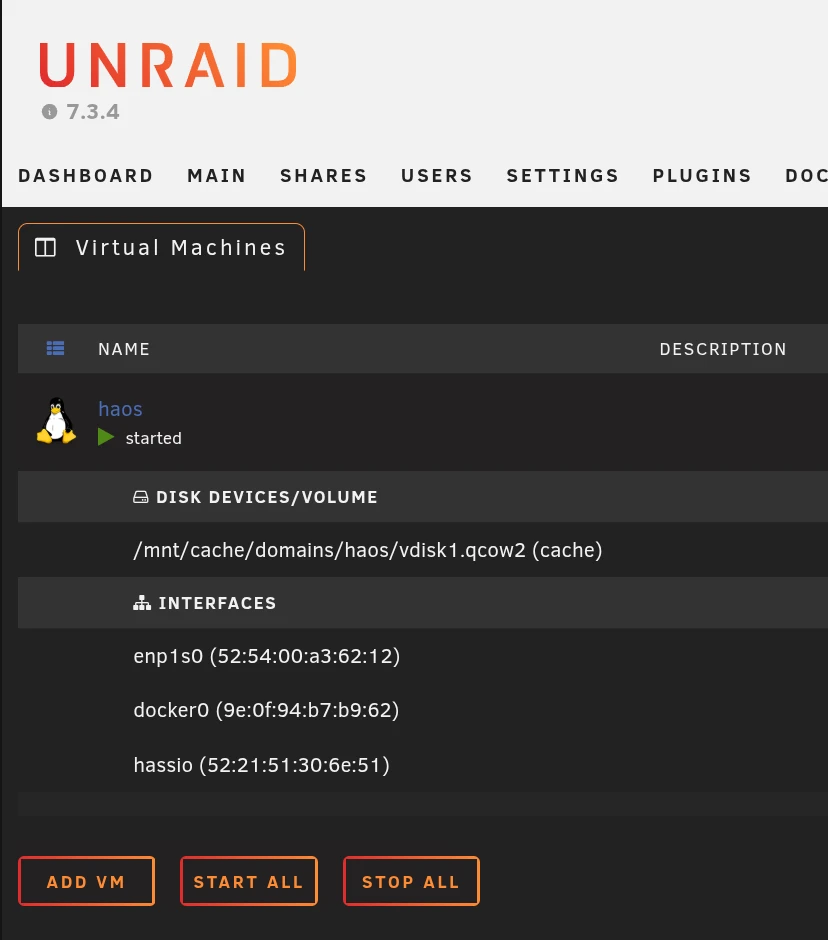
qcow2disk image directly onto the 4 TB ZFS Cache Mirror (/mnt/cache/domains/haos/vdisk1.qcow2). - Created a KVM virtual machine (
OVMFUEFI, VirtIO network bound tobr0with its static VLAN IP, and USB passthrough for the Sonoff Zigbee 3.0 USB Dongle Plus10c4:ea60). - Paired with local RTX 3060 12GB containers on Unraid (
wyoming-whisperfor speech-to-text,wyoming-piperfor text-to-speech, andollamafor local LLM intent processing), Home Assistant voice pipelines now respond in milliseconds while the VM idles at a load average of0.08.
Zero-Downtime VM Backups (18 GB in 102 Seconds)
Instead of shutting down Home Assistant every week to back up its virtual disk, I configured the VM Backup plugin to use the QEMU Guest Agent (fsfreeze) and zstd multithreaded compression:
- Before copying the vDisk,
libvirtinstructs the QEMU Guest Agent inside HAOS to freeze filesystem writes (fsfreeze-freeze), flushing SQLite and MariaDB transactions cleanly to disk. - Unraid streams and compresses the 18 GB
qcow2image usingzstdin 1 minute 42 seconds (102s), then immediately thaws the filesystem (fsfreeze-thaw). Home Assistant stays online the entire time without dropping a Zigbee or MQTT packet.
Nightly Offsite Sync to Google Cloud Storage (rclone --size-only)
For offsite backups, an Unraid User Script runs every night at 03:30 to sync critical shares (Photos, Documents, Music, and encrypted archives) to a Google Cloud Storage (GCS) bucket protected by customer-managed encryption keys (CMEK):
|
|
By default, rclone compares checksums or modification timestamps, which can force local disk reads or slow metadata comparisons across hundreds of thousands of photo files. Passing --size-only cut the nightly pre-sync check from hours to a few seconds.
Step 5: The Shared APC UPS Setting That Almost Killed My Router (KILLDELAY 0)
During UPS failover testing, one setting in Unraid nearly took down my entire network. My APC Back-UPS BX1200MI powers three devices:
- UniFi Dream Machine Pro (UDM Pro) and core PoE switches
- Minisforum MS-01 Docker host
- Custom Unraid NAS (connected to the UPS via USB cable as the
apcupsdmaster)
Because the Unraid NAS spins 10 mechanical hard drives, I configured it to start a clean shutdown early in a power outage, as soon as battery runtime drops below 15 minutes or battery charge hits 35%.
Gotcha: In Unraid’s Settings -> UPS Settings, watch out for “Turn off UPS after shutdown”. If you leave it set to Yes, Unraid instructs the APC UPS to cut AC output power (
killpower) right after the NAS finishes shutting down. Because my UDM Pro and Minisforum MS-01 share that same UPS and draw far less power than 10 hard drives, sendingkillpowerfrom Unraid cuts power to the router and Docker host while the battery still has 35% charge left! Always set Turn off UPS after shutdown:No(which writesKILLDELAY 0in/etc/apcupsd/apcupsd.conf) when your NAS shares a UPS with network gear.
Summary
To sum it up, moving from the QNAP TS-873 to this custom Unraid 7 build solved every storage, noise, and compute bottleneck in my homelab. With all 10 drives mounted in the sound-dampened Fractal Define 7 PCGH and cooled by Noctua fans, the array sits at 37–39 °C and the SanDisk ZFS pool runs at 28–31 °C while remaining practically silent in the office.
Best of all, when the 92 TB array eventually fills up, I don’t need to rebuild a RAID group or buy a new appliance: I can just swap out the smallest disk (4 TB or 8 TB) for another 16 TB drive and let Unraid expand the filesystem in place.