 Image management is a crucial part of today’s Internet. We generate huge amount of images, we need to store them and it all takes place somewhere. On my blog over many Years, I produced a lot of articles, many with images. I never really bothered about the images that much. They existed and I used them on my blog. However, after moving from WordPress to a static blog generator my ultimate goal was stop using JPG or PNG file formats to improve page speed loading time, to decrease blog size and use modern image formats.
In todays blog I will show you what is WebP format and how I reduced the size of images by 5 times!
What is WebP?
WebP is a raster graphics file format developed by Google intended as a replacement for JPEG, PNG, and GIF file formats. It supports both lossy and lossless compression, as well as animation and alpha transparency.
Google announced the WebP format in September 2010, and released the first stable version of its supporting library in April 2018.
Why should you care about it?
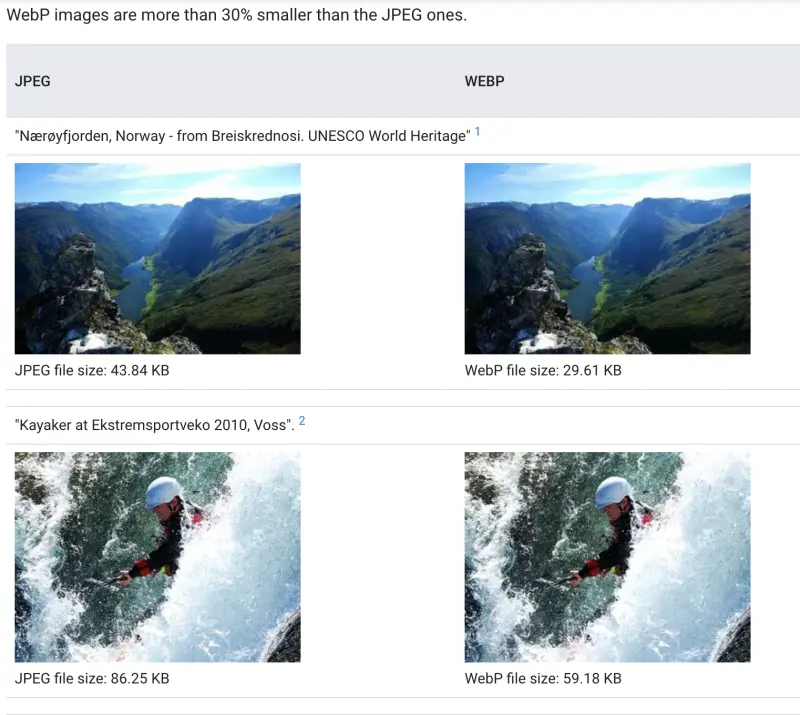
Excellent question :) Part of it was answered in the intro section of the post. WebP is highly efficient graphical image format which with the same image quality takes less space. On Google WebP webpage you can see very nice comparison of WebP image and PNG image.

How I reduced my blog size by x5?
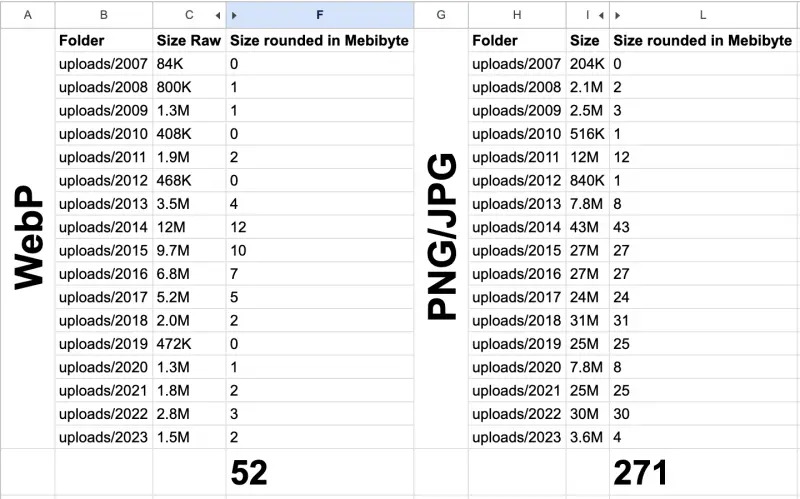
The answer isn’t mysterious. I simply converted all my images from JPG and PNG format into WebP. As I am using static webpage generator - Hugo and I store all my post on GitHub after testing conversion I simply replaced all JPG and PNG occurrences to WebP.
On the next picture you can see the size of folder before and after using WebP format.

How you can convert all PNG and JPG images to WebP?
You can download pre-compiled utilities and libraries from WebP website. I am using macOS so I used brew to download cweb by using command brew install cweb.
Then on macOS I used following scripts from the blog https://www.roberthorvick.com/blog/converting-images-from-png-jpg-to-webp-and-resizing:
- PNG
for x in $(find . -iname '*.png');do cwebp -resize 800 0 "${x}" -o "${x%%png}"webp;done - JPG
for x in $(find . -iname '*.jpg');do cwebp -resize 800 0 "${x}" -o "${x%%jpg}"webp;done - JPEG
for x in $(find . -iname '*.jpeg');do cwebp -resize 800 0 "${x}" -o "${x%%jpeg}"webp;done
I didn’t test it on Windows but a script from GitHub might be useful.
|
|
Summary
I hope you will find this post useful and you will as well benefit from the image size decrease as much as I did :)